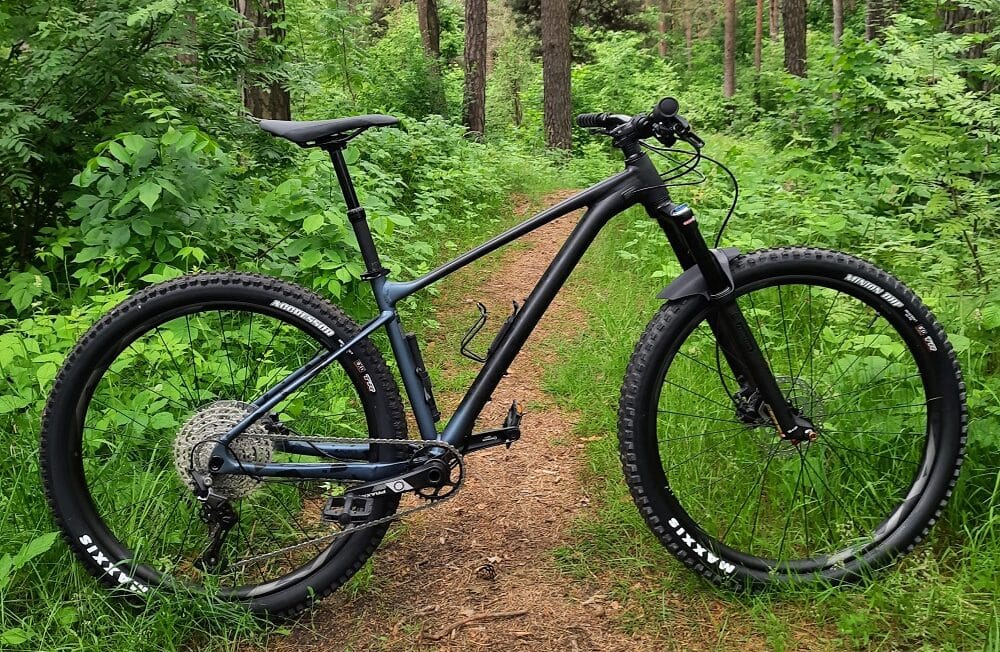
Whether you’re a seasoned rider or just starting to explore the world of off-road adventures, this guide will help you understand the different mountain bike parts, and a mountain bike geometry.
We’ll dive into the nitty-gritty of mountain bike components, from the frame and suspension to the drivetrain and wheels. So, grab your helmet, and let’s get rolling.
The MTB can be basically divided into seven major groups.

- Frame;
- Suspension;
- Wheels;
- Tires;
- Drivetrain;
- Brakes;
- Other components.
Let’s go through each of them. First, the frame:
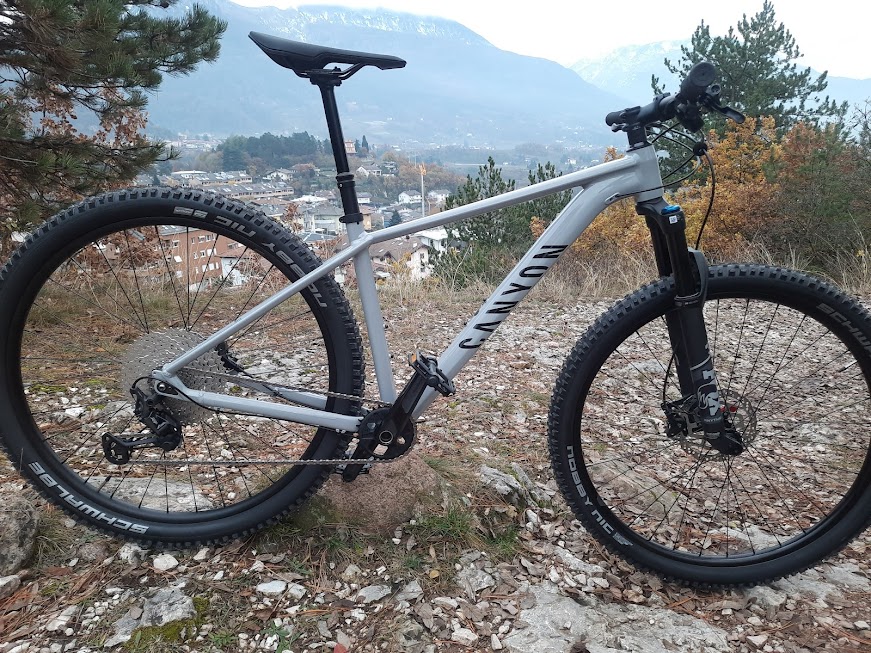
1 – Frame
The most important bike part is the frame, and it is the first thing you must choose when buying a new rig. The anatomy of a mountain bike frame can be more easily understood when divided in: parts, materials, geometry and size.
Frame parts
A mountain bike frame is composed of the following parts:

- Top tube: The horizontal or slightly sloping tube that connects the head tube to the seat tube.
- Down tube: The tube that connects the head tube to the bottom bracket shell.
- Head tube: The front vertical tube that houses the headset and connects the fork to the frame.
- Seat tube: The vertical tube that holds the seat post and connects the top tube and bottom bracket shell.
- Bottom bracket shell: The part of the frame that houses the bottom bracket bearings and connects the down tube, seat tube, and chain stay.
- Chain stay: The pair of tubes that run parallel to the chain and connect the bottom bracket shell to the rear dropouts.
- Seat stay: The pair of tubes that run from the rear dropouts to the seat tube, typically connecting near the top of the seat tube.
- Rear dropouts: The slots or tabs at the end of the chain stay and seat stay where the rear wheel is attached to the frame.
- Rear triangle: The combination of chain stay, seat stay, and rear dropouts that forms the rear part of the frame,
Frame materials
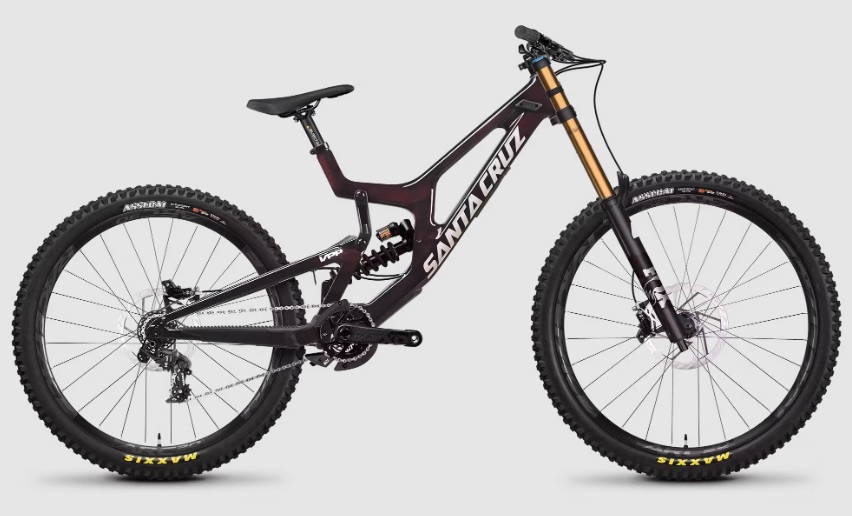
A modern mountain bike frame usually has aluminum as the primary material. Lighter – and more expensive – bikes use frames made of carbon fiber. Some frames may have a rear suspension system – which we call “shock” – as in this example:
After the frame format and size comes the material, usually made of aluminum or carbon fiber, as we’ll see next.
Aluminum bike frames
Aluminum frames make up the majority of frame size offerings. And not by chance: it’s a straightforward material to handle in production, significantly cheaper to manufacture and accomodate many different riding styles.
Over the years, aluminum frames have received numerous improvements, reinforced where it was indispensable, and smoothed out in parts not so demanded in a pedal stroke.
Generally, aluminum frames contain other elements in their composition, such as magnesium, iron, chromium, and zinc, among others – with this composition, we call them alloy frames. The manufacturing of an aluminum frame is a much faster process than that of carbon fiber. All the frame tubes are built in series, cut, and joined by welding.
Carbon fiber frames
Carbon fiber frames started to gain popularity relatively recently. It was in 1998 that the legendary Marco Pantani became the last winner in the history of the Tour de France using a bike with an aluminum frame.
Since then, all winners have pedaled on bikes with carbon fiber frames.
The big Tours (Tour de France, Giro d’Italia and Vuelta a España) are great testing grounds for technologies, companies began to make the construction of carbon fiber frames in mountain biking viable. The novelty caught on, and today athletes only race with bikes made of this material.
Here is a photo of carbon fiber forming what would later become a frame:
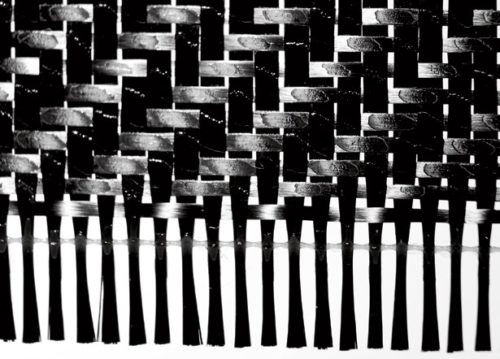
Carbon fiber is basically a fabric made of carbon filaments. When woven into a net-like structure, it becomes one of the best materials known for weight vs. strength vs. ease of production.
To manufacture a frame, the fibers are “sewn” together, so we don’t see welds and connection marks on the frame as we do with aluminum.
It’s also worth noting that Trek, Cannondale, and other manufacturers don’t produce the fiber itself. A few major carbon fiber manufacturers – all located in Asia – sell their products to different industries across the world.
The production of these manufacturers is so massive that the same carbon fiber supplier for Felt, for example, also supplies Boeing and Airbus. In other words, what determines the quality of the frame is not the fiber – as they all come from practically the same supplier – but rather who puts it together.
Steel bike frames

Steel bike frames dominated the manufacturing of bicycles at one point. With the emergence of new materials and technologies, steel began to be replaced by aluminum and carbon fiber.
However, some brands still manufacture bikes – among other types of bicycles – with steel, as the main characteristics of these frames are comfort and extreme durability. Still, they are heavier than good aluminum and carbon fiber frames.
For this reason, most frame builders and manufacturers focus on niches that do not require the world’s lightest bicycle. Instead, they build for comfort, and durability, making excellent bikepacking and adventure bicycles.
Frame geometry and size
Mountain bike frame geometry is a crucial aspect of bike design that defines how a bicycle handles, feels, and performs on various terrains. It consists of a complex interplay of angles, lengths, and dimensions that, when combined, create the unique characteristics of a specific bike model.
The following bullet points detail key terms related to mountain bike frame geometry, which will provide a solid foundation for grasping the intricacies of this essential aspect of bicycle design.

- Head tube angle: The angle between the head tube and an imaginary horizontal line; determines the steering responsiveness and stability of the bike.
- Seat tube angle: The angle between the seat tube and an imaginary horizontal line; affects rider position and pedaling efficiency.
- Effective Top Tube Length: The straight distance between the front and middle part of the bike, measured in a flat line; helps to determine the right bike size for a comfortable reach and riding position.”
- Chainstay length: The distance between the bottom bracket shell and rear dropouts; influences handling, stability, and climbing ability.
- Wheelbase: The distance between the front and rear axles; a longer wheelbase provides increased stability, while a shorter wheelbase offers more responsive handling.
- Bottom bracket height: The vertical distance from the ground to the center of the bottom bracket; affects ground clearance, pedal strikes, and overall handling characteristics.
- Stack: The vertical distance from the bottom bracket to the top of the head tube; influences rider position and cockpit height.
- Reach: The horizontal distance from the bottom bracket to the top of the head tube; determines the effective length of the bike’s cockpit and the rider’s ability to control the bike.
- Standover height: The vertical distance from the ground to the top of the top tube; important for rider comfort and clearance when standing over the bike.
Frame geometry in different types of mountain bikes
Here is how frame geometry changes in the most popular types of mountain bikes:
XC mountain bikes
Cross country mountain bikes are designed for speed, efficiency, and climbing ability. Their geometry consists of a have steeper head and seat tube angles for better power transfer and control while climbing. They are also more nimble and responsive in tight, technical sections due to shorter wheelbases and chain stay lengths. These bikes have lower amounts of suspension travel compared to downhill and trail bikes, contributing to their lightweight nature and efficiency:

Downhill and enduro bikes
DH and enduro bikes are built for aggressive riding and tackling steep, challenging descents at high speeds. They have slacker head angles for increased stability and confidence when descending. The seat tube angles may be slightly less steep to allow for a more rearward weight distribution, aiding in maintaining traction and control on steep descents. These bikes have longer wheelbases and chainstay lengths for enhanced stability at high speeds and over rough terrain. They also have more suspension travel to absorb impacts from drops, jumps, and rugged trails:
Trail and all-mountain bikes
Trail and AM bikes are versatile and balance climbing efficiency with descending capabilities. They have moderate geometry for comfortable and efficient pedaling with stability on descents. The wheelbase and chainstay lengths are between those of XC and downhill/enduro bikes, and they have intermediate suspension travel for cushioning on rough trails without sacrificing pedaling efficiency:

Here is view of a cross country (blue), trail (purple), and downhill (orange) geometries overlapped:

I have a full article on MTB disciplines if you want to learn more about all types of mountain bikes.
2- Mountain bike forks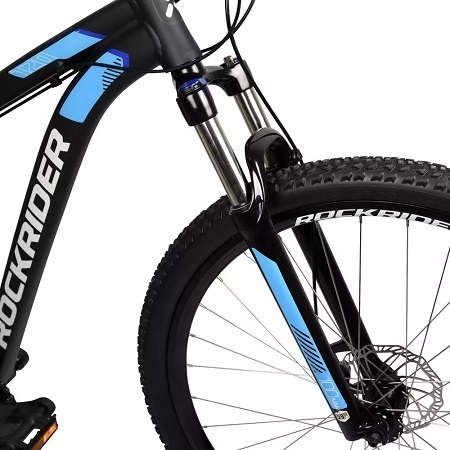
As we’ve discussed, a bicycle can either have a rigid frame (also known as hardtails) or full suspension. Hardtails feature only one suspension, referred to as a suspension fork. On a full-suspension mountain bike, there’s an additional rear suspension, commonly called a shock.
The primary function of suspension is to adapt to the uneven terrain, providing more control and less arm fatigue during descents and pedaling. In other words, it absorbs bumps.
Modern suspensions have significantly advanced in recent years, incorporating a range of technologies that warrant an entire article discussing the anatomy, properties, and innovations of contemporary suspensions. In this section, we’ll focus on the basics.
In most suspensions, each leg (left or right) typically performs a specific function: one for compression (the damper) and the other for damping (the spring).
The spring’s role is to return the suspension to its original position, while the damper controls the spring’s return.
Without the damper, the spring would cause abrupt jolts in the suspension with each impact, making the bike bounce and putting the rider at risk. That’s why there’s a rebound adjuster on the damper side, which controls the speed at which the suspension returns to its initial position.
Additionally, many modern suspensions have adjustments for stiffness and sensitivity, allowing riders to fine-tune the suspension to suit their preferences and adapt to different terrain conditions.
3- Wheels
After the frame and fork, wheels are the most essential parts of a mountain bike because they play a crucial role in the overall structure of the bike; stiffness, resistance, lightness, and shock absorption significantly affect the bike’s performance.
One crucial topic in this area is the size of the wheel rim: In the 80s and 90s, 26″ rims were the standard. In 2006, mountain bike wheels with 29″ rims – the same diameter as road bike wheels (700c) – started being produced on a larger scale.
This subject is so extensive that it should be discussed more thoroughly and carefully to avoid doubts. In this chapter, we will stick to the basics that meet the needs of mountain bikers when choosing a tire.
In other words, 29″ wheels became more popular because the larger diameter makes overcoming obstacles on singletrack trails and dirt roads easier.
Wheels are basically composed of the following parts:
- Tire – can come with a tube or without (tubeless);
- Rim – where the tire is installed;
- Spokes – connect the rims to the hubs;
- Hub – responsible for the rotation of the wheel;
- Axle – fixes the wheel to the frame and fork;
Next, let’s talk about the tire. This component deserves special attention depending on the use and terrain where the bike will have its adventures.
Front and rear wheels’ differences
Additionally, front and rear wheels have a few key differences.
Rear and front mountain bike wheels differ in function, hub design, and strength requirements. The front wheel focus on responsive steering and impact absorption, while the rear wheel manage power transfer and traction.
Front hubs are simpler and lighter, connecting to the fork via the axle. Rear hubs are more complex, featuring a freehub mechanism for coasting and drivetrain engagement, and accommodate the cassette. Rear wheels have higher spoke counts or stronger spokes for increased stiffness and durability due to pedaling forces.
4- Tires

Continuing on the topic of Wheels, we need to look at Tires separately, as they are of great importance and vary significantly in type, shape, and composition, especially within each subcategory of mountain biking.
The most important points to consider within Tires are:
Bead
Tires can come with their side edge – AKA bead – made of Kevlar or aramid. The truth is that Kevlar is a compound of aramid but with structural differences that make it more flexible than what we usually call “aramid” in MTB.
The main differences between the two models are that Kevlar can be folded in addition to being slightly lighter.
Width
Tire width is measured in inches, for example, 2.2″, 2.0″, 1.95″, etc. Normally, you see the tire dimension as presented in the photo above. A 29″ wheel with a 2.2″ tire would be labeled as 29×2.2″.
The smaller the width, the faster the rolling, and the less grip the tire will have on the ground. On the other hand, the wider the tire, the greater the resistance in rolling, which makes it more stable and consequently slower.
Tread
Perhaps this is the most critical aspect when choosing a new tire. The tread – the part of the tire that is in contact with the ground most often – varies greatly depending on its function.
For example, a road bike tire has an entirely smooth tread since the asphalt keeps the tire in contact with the ground.
In mountain biking, however, the terrain varies wildly. Sometimes we are on a smooth dirt road; sometimes, you will be on a slippery gravel descent. In general, mountain bike tires can be divided into fast, intermediate, and gravity. In the image above, you can see all three.
When tires are made for rough terrain, we usually call them knobby tires.
Tubeless
Tubeless Tires are simply tires without an inner tube. They also come with an anti-puncture sealing liquid, which seals punctures in the tire within seconds. Many tires come with the “Tubeless” brand on the side, indicating that they were created specifically for this technology.
Some wheels can be converted to tubeless, but using wheels designed for this technology is best.
The advantage of tubeless is using lower tire pressure, which increases traction in certain conditions and avoids the common punctures caused by the inner tube when the rim hits an obstacle. In addition, it eliminates the weight of the inner tube, making the wheel lighter.
However, even if you have a tubeless set up, it’s important to carry a spare tube on your ride. You wouldn’t want to be stranded pushing your bike downhill in the middle of nowhere.
5- Drivetrain
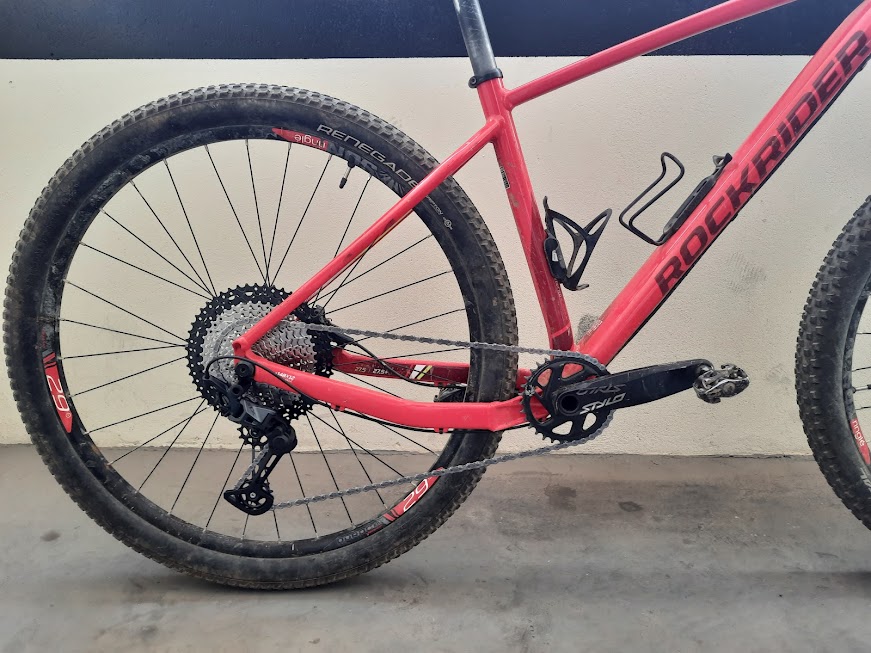
The role of the drivetrain, as the name suggests, is to transmit the force exerted by the cyclist to the rear wheel, which results in rotation.
The force on the pedal makes the crankset turn, and the traction is passed to the rear wheel through the interface of the chainrings, chain, and cassette. To better understand the name and function of each piece, see below.
The drivetrain of a mountain bike involves the following parts:
Crankset
It is the set of two crank arms where the pedals are installed. The chainrings are installed on the right side of the crankset or right arm.
Bottom bracket
It is the part that connects the crankset to the bike frame. Numerous standards exist, from models threaded into the frame to bearings pressed in. They vary in length, diameter, bearing type, etc. The models vary according to the manufacturer and the kind of use of the bike, but that’s a topic for another time.
Cassette
It is the gear that is fitted onto the freehub body of the rear wheel hub. It can have 6 to 12 cogs (speeds). When we say freewheel, we refer to the simpler models, with 6 or 7 speeds, threaded directly onto the hub.
Derailleurs
Front and rear derailleurs are in charge of performing the commands given by the shifters.
The rear derailleur is the one that works the most, derailing (shifting) the chain between the cogs of the cassette. The front derailleur changes the chain between the chainrings of the crankset. It is worth noting that many bikes are being built with a single crankset (only 1 chainring), which means the absence of the front derailleur.
Chain
What gets the bike forward. The bike chain is sold by models that vary according to the number of cogs (speeds) on the cassette. That is, if there is an 11-speed cassette, the chain must be specific for an 11-speed cassette.
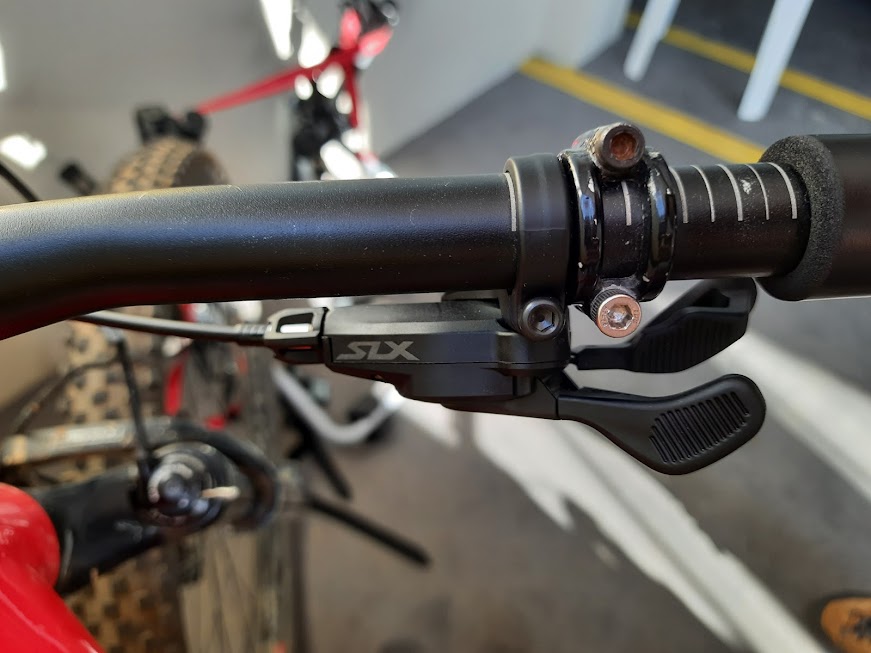
Shifters
Shifters are controls attached to the handlebar that makes you – you guessed it – shift gears. They will activate the derailleurs to change the chain from one chainring to another. A bike that doesn’t have a front derailleur will only have one shifter – the rear one.
Mountain bike gear ratio can be written as follows: 34/11-50
In translation: “single crankset – or 1x (one by) – with 34 teeth and cassette with the smallest cog of 11 teeth and largest with 50 teeth.”
There are two major mountain bike drivetrain component brands: SRAM and Shimano. Each offers components that equip both entry-level bikes and the most sophisticated bikes for world-class competitions.
6- Brakes
In this section, we’ll delve into the two main types of braking systems found on mountain bikes: rim brakes and disc brakes. We’ll also discuss the variations within each category and touch upon the common practice of using different rotor sizes in cross country and trail bikes.
Rim Brakes
Rim brake systems utilize brake pads that, when activated by a steel cable attached to the brake lever, make contact with the bike’s rim to slow it down. These pads are typically made of rubber and other types of resins.
The most common rim brakes are V-Brakes and Cantilever brakes. V-Brakes are popular and often found on entry-level mountain bikes. In contrast, Cantilever brakes are now less common but still used on some cyclocross or budget road bikes.
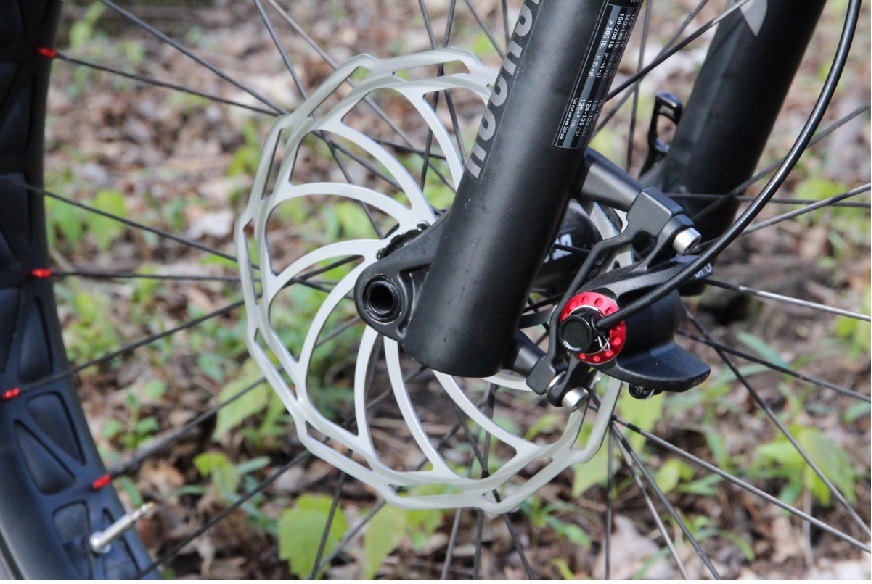
Disc Brakes
Disc brakes, as the name implies, work by compressing a brake rotor using pads activated by a caliper. There are two types of disc brakes: mechanical and hydraulic.
The fundamental principle is the same for both, with differences in caliper activation technology. Mechanical disc brakes use a cable to pull the pad against the rotor, while hydraulic disc brakes rely on fluid pressure to push the pads against the rotor. Although the principle is similar, hydraulic systems are generally more efficient than mechanical ones.
In cross country and trail bikes, it’s common to see a smaller rear rotor compared to the front one. This setup provides good braking performance, as the front brake generally handles the majority of the stopping power. Plus, it makes for cheaper bikes overall.
7- Other Components
Finally, there are a series of other bike components.
Saddle
One of the cyclist’s main points of contact with the bike, the saddle is a fundamental piece for the cycling experience to be as close to perfect as possible. A good saddle is one that you forget its existence.
As each cyclist, whether a recreational, weekend athlete, or elite professional, has their own position, anatomy, and preference, the saddle must be suitable for each type of use. To do this, the best option is to seek a specialized store or professional to understand which type of saddle best adapts to each person’s needs.
Seatpost
This is the piece responsible for connecting the saddle to the bike frame. It can be made of aluminum, carbon fiber, or scandium.
The seat post is part of the bike that holds the saddle. When you start mountain biking on steeper descents, you’ll quickly realize that it would be much better if your seat was lower.
To lower it, you have to get off the bike, release the clamp, lower the seat, and raise it again when the descent is over.
This is bearable at the amateur level, but there’s no time for such stops in competition. That’s where the dropper seat post comes in:
It’s basically a control that moves your seat just like an office chair would. This technology is a wonder; many – even cross-country – are now using this feature as standard.
They are not as expensive as they used to be, so it’s really something we’ll see more and more in new mountain bikes.
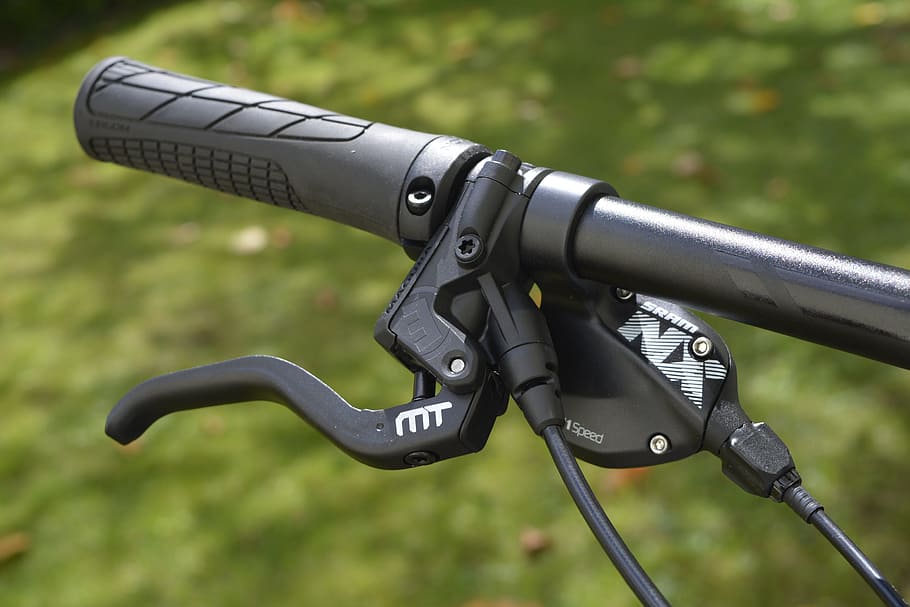
Handlebar
Available in various sizes, angles, and shapes, the choice of handlebar will vary according to the cyclist’s preferences, ideally adjusted to the fit that best suits the cyclist’s posture.
All bike controls are installed on this piece: shift levers, brake levers, suspension control, bells, handlebar grips, etc.
The handlebar grips, it’s worth noting, are where you hold the bike. Each cyclist has their own grip preference. There are foam, EVA, silicone, rubber, anatomical, soft, and rigid models. The important thing in choosing the grip is that the cyclist feels comfortable and in control of the bike.
Stem
The bike stem is a crucial component that connects the handlebar to the bike’s front fork, playing a key role in the overall steering and control of your mountain bike. It’s responsible for keeping your handlebars securely in place and ensuring you have a comfortable, ergonomic grip while navigating various terrains.
Stems come in different lengths and angles, allowing riders to fine-tune their bike’s handling characteristics and riding position to suit their preferences and riding style. The choice of stem also affects the bike’s overall reach, which can impact both comfort and performance.
Pedals
Pedals are the essential connection point between your feet, mountain bike shoes, and the bike itself. The type of pedal you choose largely depends on the discipline you practice and your personal preference. Mountain bike pedals mainly fall into two categories: flat pedals and clipless pedals.
Flat pedals, also known as platform pedals, provide a large, flat surface for your feet to rest on while pedaling. These pedals offer great grip and allow you to quickly adjust your foot position or easily dismount when needed, making them popular among beginners and those who ride technical trails.
Clipless pedals, on the other hand, require the use of mountain bike shoes with cleats that attach to the pedal mechanism. This secure connection provides better power transfer and pedal efficiency while also keeping your feet in the optimal position for control and stability.
Conclusion
In this comprehensive guide, we’ve explored the various components that make up a mountain bike, from the frame and wheels to the intricacies of pedals and suspension systems.
As the mountain biking world continues to evolve, stay curious and keep learning about mountain bike new advancements and trends to make the most of your off-road adventures.